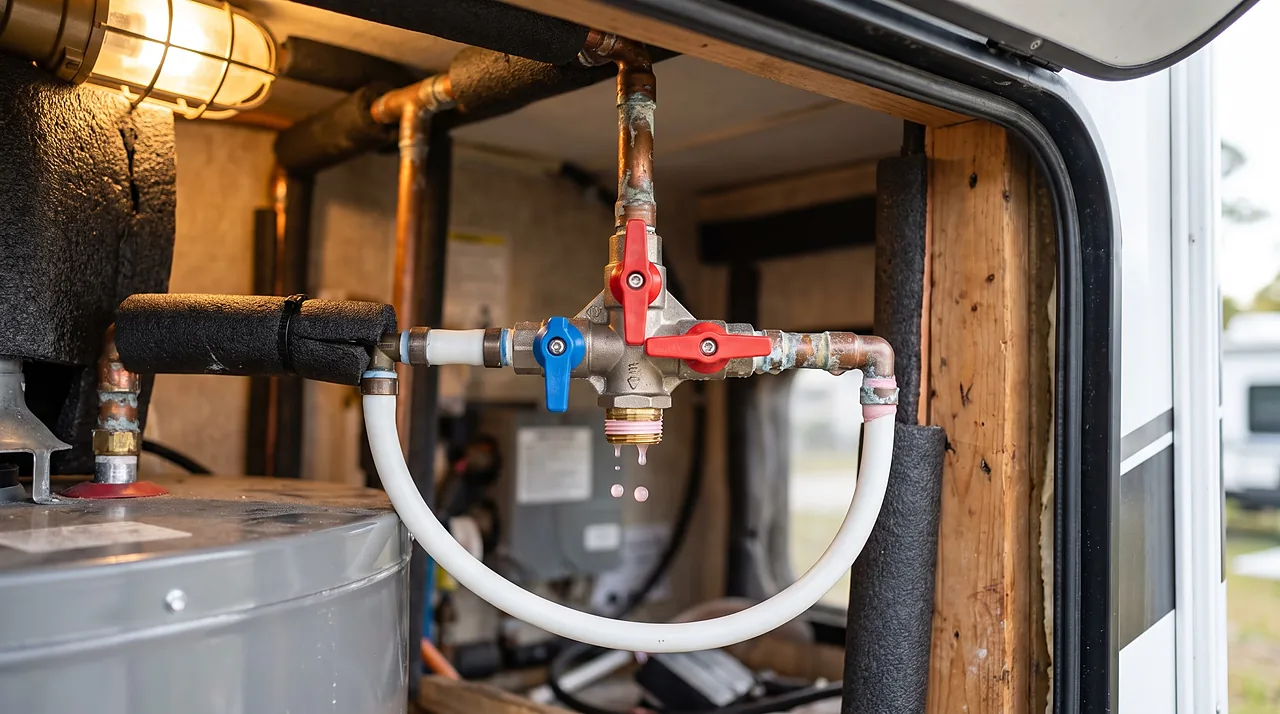
A 6-gallon water heater tank will swallow six gallons of antifreeze (ten on a 10-gallon tank) before any pipe downstream is protected, all of it to be drained out again in spring.
The bypass valve is the small piece of plumbing that fixes this. Set correctly, it reroutes the cold water line straight to the hot water line and skips the tank entirely, so antifreeze goes only where it's actually needed: the lines, the faucets, the toilet, the pump. Most owners have never touched theirs, mostly because nobody pointed at it and said what it was for.
What the valve is actually rerouting
A water heater normally sits in the middle of the plumbing loop. Cold water enters the tank, gets heated, and leaves through a separate hot water line. A bypass kit adds a short jumper line between those two connections, plus one or more valves that decide which path the water takes. In the normal position, water flows through the tank like it's supposed to. In the bypass position, it skips the tank and flows straight across the jumper.

Suburban's own manual is direct about why this matters at winterizing time: a bypass kit should be used to close off the water heater, drain it completely, and leave it isolated from the rest of the plumbing before antifreeze goes in, because antifreeze is corrosive to the tank's anode rod and can leave heavy sediment behind if it sits in there all winter. An empty, isolated tank has nothing for the antifreeze to damage, because the antifreeze never reaches it.
Find out what you actually have
Not every rig uses the same hardware, and the fastest way to get this wrong is guessing based on what a forum post described for someone else's trailer. Look near the water heater's rear access panel, in the wet bay, or on the outside hookup panel where the city water inlet lives. Use the valve handles themselves to identify which of four setups is installed, then set it using its own bypass and normal position.

Single valve, built-in check
What it looks like: one lever valve near the cold inlet, with no second handle nearby.
Bypass position: turn the handle to the marked bypass position; internal check valves route flow around the tank automatically.
Normal position: turn the handle back to normal or operate.
Dual valve, permanent kit
What it looks like: two lever valves mounted close together in a small block, with hoses running to both sides of the tank.
Bypass position: turn both handles a quarter turn so they point toward the jumper line instead of the tank ports.
Normal position: turn both handles back so they point at the tank's hot and cold ports.
Three-valve, factory or aftermarket
What it looks like: three separate handles, sometimes labeled on a placard on the wet bay door: one bypass valve, one cold shutoff, one hot shutoff.
Bypass position: open the dedicated bypass valve, close both the hot and cold shutoff valves.
Normal position: close the bypass valve, open both the hot and cold shutoff valves.
No bypass installed
What it looks like: one line runs straight to the cold inlet, another straight to the hot outlet, with no extra valves or jumper block anywhere nearby.
Bypass position: not available; see the section below on winterizing without one.
Normal position: not applicable.
If the valve handles are unlabeled and you genuinely can't tell which position is which, trace the actual hose or pipe each handle controls back to the tank fittings before you turn anything. A wrong guess doesn't damage anything by itself, but it defeats the entire point: antifreeze still ends up in the tank if the bypass isn't actually open.
Setting it for winterizing
Once you've identified which type you have, the sequence is the same regardless of valve count.
- Turn off the water pump and disconnect city water, then open the low-point drains and the water heater drain to empty the system.
- Turn the bypass valve or valves to the bypass position for your setup, using the identification above. On a three-valve setup, this means the bypass valve opens while the hot and cold shutoffs close.
- Turn the water heater off on both fuels first: the gas switch and the electric switch, including the outside electric switch some Suburban units have on the heater itself, then let the tank cool. Do not turn the heater on with no water in the tank, gas or electric, since running the electric element dry can burn it out.
- Run antifreeze through the rest of the system as usual: pump it through each faucet, the shower, the toilet, and the outside shower if the rig has one, until pink fluid runs from each fixture.
- Confirm no pink fluid is reaching the water heater drain. If it is, a valve isn't fully seated in the bypass position and needs to be checked again.
If you already poured antifreeze into the tank
This happens more often than anyone likes to admit, usually because the bypass valve looked like just another shutoff and got left alone. If the tank has already taken on antifreeze, drain it the same way you'd drain it for any other reason: shut off power to the heater, let it cool completely, then open the drain (on a steel Suburban tank this is the anode rod itself, removed with a 1-1/16 inch socket). Antifreeze sitting against the anode rod is a real problem on a steel tank, since the manufacturer's own guidance is that antifreeze is corrosive to the rod and can cause premature failure along with heavy sediment buildup in the tank. Drain it fully, flush the tank with a few gallons of fresh water, and set the bypass properly before winter actually arrives.
Getting the fluid chemistry right in the first place also matters here. Only RV or marine antifreeze, propylene glycol, belongs anywhere near a drinking water system; automotive coolant does not, regardless of what color the jug is. The full breakdown of which fluid to buy and how much a given rig actually needs lives in the RV antifreeze guide, and it's worth reading before the next round of winterizing rather than after.
No bypass valve at all
Plenty of older or budget-built rigs never got one installed at the factory, and kits range from a basic single-valve version to multi-valve kits with brass check valves (check current prices). Until it's installed, there are two safe paths, and which one applies depends on what the tank is made of.

Suburban builds steel tanks with a sacrificial anode rod protecting the tank wall, and running antifreeze through an unprotected tank corrodes that rod faster than normal use ever would. Without a bypass kit, the manufacturer's instruction is specific: pull the anode rod, store it somewhere dry over winter, and thread a 3/4-inch drain plug into that same opening in its place while the antifreeze sits in the empty, sealed tank. Reinstall the anode rod, with fresh thread sealant rated for potable water, when de-winterizing in spring.
Dometic and Atwood aluminum tanks do not use an anode rod, so there's no rod to remove or protect from antifreeze. That doesn't mean filling the tank is free, though; a 6-gallon aluminum tank still costs a full 6 gallons of antifreeze to fill for no functional reason if a bypass kit isn't installed. Confirming which tank type sits behind the access panel, and what that means for maintenance the rest of the year, is covered in more depth over at the anode rod comparison between Suburban steel and Dometic aluminum tanks.
What the bypass saves
A water heater tank typically holds 6 or 10 gallons, so bypassing it saves 6 to 10 gallons of antifreeze. The lines themselves take only a few gallons on most trailers, more on a long rig with two bathrooms; skip the bypass and the tank's full volume goes on top. Check the tank size on the heater's data plate rather than a model badge.
Setting it back in spring
The single most common callback after winterizing season isn't a broken heater, it's a bypass valve left in the winter position after the rest of the system gets reversed. Water runs cold at every fixture because the hot line is still routed straight past the tank instead of through it. Flip the valve or valves back to normal, refill the tank completely before switching the heater on, and confirm hot water actually reaches a faucet before assuming the heater itself has failed. The full de-winterizing sequence, tank by tank, is laid out in the de-winterizing steps and the complete RV winterizing walkthrough, which covers this step alongside the rest of the reversal.
If the bypass is confirmed back in the normal position, the tank is full, and there's still no hot water or the heater won't fire at all, that's a different repair. Ignition faults, a tripped high-limit switch, and a dead electric element are covered separately in why the water heater isn't working, and chasing valve positions any further at that point just wastes daylight.
Questions
What owners ask next
My bypass valve is stiff and won't turn all the way. Is that dangerous?
Not dangerous, but worth fixing before you need it in a hurry. A valve that sits untouched for a year often just needs working back and forth a few times to break loose old mineral buildup. If it still won't seat fully in either position, replace it rather than forcing it, since a valve that doesn't fully close will leak antifreeze into the tank anyway.
Do I need to put any antifreeze in a bypassed water heater tank at all?
No. A properly bypassed and drained tank is isolated from the rest of the plumbing, so there's no standing water left inside it to freeze. That's the entire point of draining it completely rather than leaving a partial fill.
Can I skip buying a bypass kit and just blow the tank out with compressed air instead?
Draining and blowing out the lines with low-pressure air removes most of the water, but a water heater tank has a dip tube and internal shape that traps residual water in a way compressed air alone often doesn't fully clear. A bypass kit paired with a full drain is the more reliable combination, and it's the standard most manufacturers build their winterizing instructions around.
The valves are definitely back in the normal position, the tank is full, and there's still no hot water. What else could it be?
At that point the bypass itself probably isn't the problem, so look at what a correctly reversed bypass can still hide. On a single-valve kit with a built-in check valve, a check valve that's stuck or gummed up can leave a small pocket of trapped air on the tank side even though the handle reads "normal," which shows up as lukewarm or sputtering water rather than a full cold-water bypass symptom; cracking the pressure relief valve briefly to bleed that air often clears it. If the water is fully cold rather than lukewarm, that points less at plumbing and more at the heater itself, most often a tripped high-limit switch (a fairly common nuisance trip after a tank sits empty over winter, and a simple reset on most models) rather than anything left over from the bypass.
Is a water heater bypass necessary?
It is not required to winterize, but without one the tank fills with antifreeze (6 to 10 gallons wasted) and, on a Suburban steel tank, antifreeze sits against the anode rod all winter. With no kit, drain the tank and follow the no-bypass steps above.
Read next
Keep going on this system
Sources
What this guide is based on
- Suburban (Airxcel) Tank Water Heaters Operation & Maintenance Guide
- Dometic Support, "Using After-Market Anode Rods"
- Dometic Corporation, L.P. Gas Water Heater Installation and Operation Manual (6-Gallon Models)
Built from manufacturer manuals and published specifications. If something here does not match your appliance label or manual, the label and manual win.