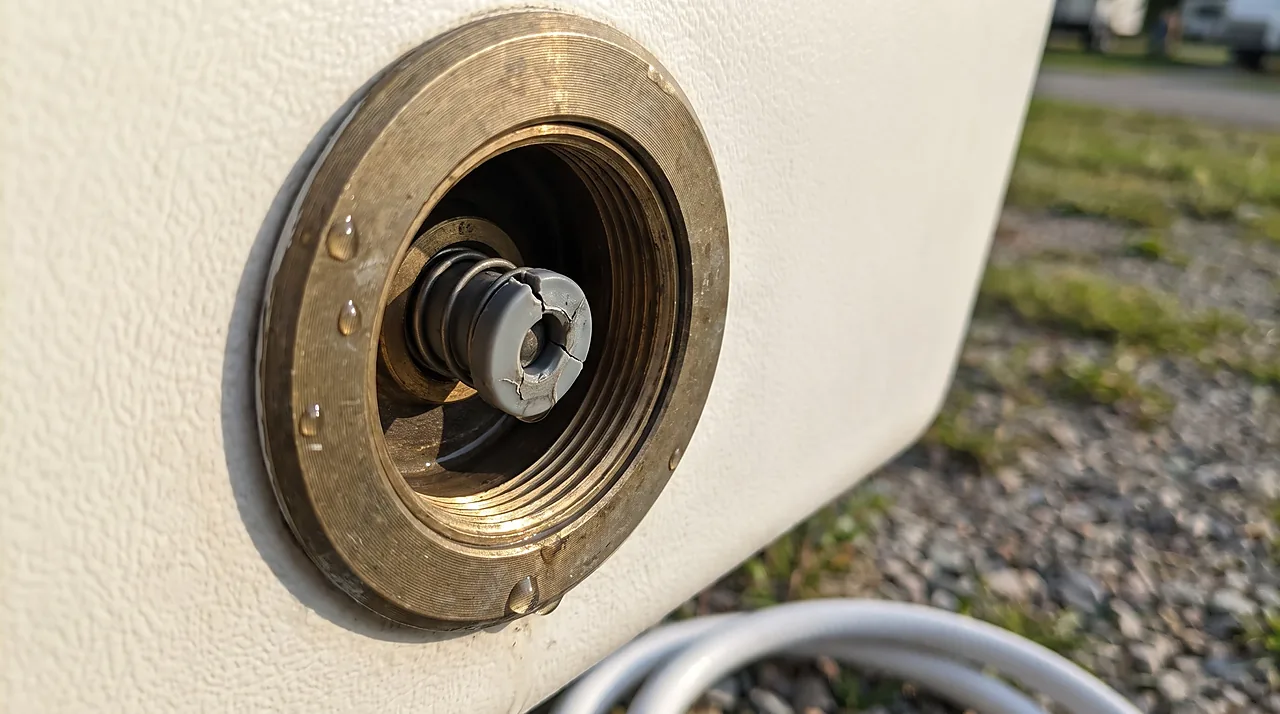
You're standing at the pedestal with a fresh hose screwed into the RV's water inlet, the campground spigot cranked open, and the faucet inside runs dry. Nothing. Not even a sputter. Before you assume the pump died or the lines froze, check the small plastic button inside the city water inlet itself. That little spring-loaded plunger is one of the most common reasons a city water hookup goes from "should just work" to "no flow at all," and it's a part that costs less than a campground firewood bundle.
This covers the hookup itself, what the check valve inside the inlet actually does, how to tell a stuck or broken plunger apart from a pump or filter problem, and where to draw the line before you're chasing pressure damage instead of a simple part swap.
What "city water connection" actually means on an RV
Every travel trailer, fifth wheel, and motorhome has two ways to get pressurized water to the faucets. One is the onboard 12-volt water pump, pulling from the fresh tank. The other is a direct city water inlet, usually a round fitting on the exterior with a garden-hose-style threaded connection, sometimes labeled "CITY WATER" or "CITY WTR." Screw a drinking-water-safe hose from the campground spigot into that inlet, and pressurized water is pushed straight into the RV's plumbing without the pump running at all.
Inside that inlet fitting sits a check valve: a spring, a rubber-tipped plunger, and a small chamber the water has to pass through. Its job is to let pressurized city water push past the spring and into the plumbing when you're hooked up, and to block flow the rest of the time, so the pump can't push tank water back out through the inlet and onto the ground. Stopping tank water from leaving through the inlet is that valve's whole job, not keeping city water pressure out of the fresh tank. That second direction is covered by a separate check valve built into the water pump itself, which is why a pump that's aging or has a failed internal check valve can let city water push backward into the tank even when the inlet's own plunger is working fine. Two small parts, two separate jobs, and either one can fail without the other showing any symptom at all.
How to hook up city water correctly, step by step
- Use a hose rated for drinking water (usually labeled white or blue, NSF/ANSI 61 or similar), never a garden hose that's been used for anything else.
- Thread a pressure regulator onto the spigot end of the hose first, before you connect to the RV. Campground and marina supply pressure is not standardized, and it can run well above what onboard plumbing is built for, so the regulator goes on before water ever reaches the rig. Aim for 40-50 psi; RV plumbing is commonly rated for about 60 psi. Our guide to picking and setting a pressure regulator covers the psi range to dial in and the signs a regulator itself has failed.
- Connect the regulated hose to the RV's city water inlet, hand-tight plus a light quarter turn. The inlet takes a standard garden-hose thread, the same as the hose and regulator. Overtightening cracks the plastic threads on the inlet housing.
- Turn the spigot on slowly, about a quarter turn, and listen at the inlet for hissing or spraying before opening it further.
- Inside the rig, open a faucet, wait a few seconds for air to clear the lines, and confirm steady flow at both hot and cold.
- Leave the water pump switched OFF while running on city water. Running both at once isn't usually harmful with a working check valve, but it wastes battery and adds a variable when you're troubleshooting.
No flow at the city inlet: work through it in this order
Before assuming a bigger failure, rule out the cheap and common causes first. This is the order a technician actually works the problem in.


The inlet up close: what a healthy fitting looks like
A city water inlet fitting is a round flange set into the sidewall with a brass threaded center. Inside that center sits the small spring-loaded plastic plunger that does all the work in this diagnosis. On a healthy fitting, the plunger sits flush and springs back cleanly the instant you release it. A worn or failing one sits slightly off its seat, may show a hairline crack along one edge, and feels gritty or hesitates on the return stroke. That visual difference, flush-and-snappy versus tilted-and-sluggish, is the fastest field check before you touch a tool.
Work the causes in this order
- Spigot itself. Disconnect the hose and let the campground tap run into a bucket. No flow means the site has no water or the pedestal valve is shut off; there's no part to fix and no cost, just report it to the campground.
- Hose and regulator. Remove the regulator and hold the bare hose over a bucket. If flow is weak or absent here, look for a kinked hose, a clogged inline filter, or a regulator that's failed stuck shut.
- Inlet plunger movement. Press the small button inside the inlet fitting with a fingertip. It should move in and spring back. If it's broken, corroded, or seized, that's a failed plunger and spring, and the fix is a new city water inlet: an inexpensive part and a short job.
- Inlet plunger orientation. If the plunger moves but water still won't pass, the check valve may have been installed backward during a prior repair, seated the wrong way and blocking flow instead of allowing it. Reseat or replace it.
- Water pump and accumulator. If the pump runs constantly or short-cycles once city water is confirmed absent, that's a pump or pressure switch issue separate from the inlet. See a dedicated pump diagnosis before replacing parts.
- Whole system. If none of the above isolates it, suspect a frozen or airlocked line, a closed low-point drain, or a bypass valve left in the winterize position. Trace the line; there's no parts cost at this stage.
Most no-flow calls stop at step three. If you press that inlet plunger and it doesn't spring back, or it feels gritty and stuck halfway, you've found it. That plastic housing lives outside, exposed to UV, freeze-thaw cycles, and whatever gets sprayed at it during a wash, and the spring and plunger are the first parts in the whole water system to give out.
Replacing a broken check valve plunger
The inlet is a single assembly rather than a part you rebuild in place. Most owners replace the whole fitting rather than sourcing an individual spring and plunger, since the assemblies are inexpensive and the fitting threads are usually what corrode or crack first anyway.

- Turn off both the city water supply and the onboard pump, and open a faucet to relieve pressure in the lines.
- From inside the access panel or wet bay behind the inlet, disconnect the short hose or fitting that runs from the inlet housing to the plumbing.
- Remove the two or three exterior screws holding the flange to the sidewall, and pull the old inlet out.
- Match the new inlet's connection type, either male pipe thread or female pipe thread, to what the old one had; a mismatch means an extra adapter fitting you didn't plan for.
- Seat the new inlet, run a bead of non-sag sealant around the flange (it is a vertical surface) per your siding manufacturer's guidance, screw it down, and reconnect the interior line. See our guide on choosing self-leveling vs non-sag sealant.
- Pressurize slowly and check the interior connection and the exterior flange for weeping before buttoning the panel back up.
When it isn't the check valve
A handful of things mimic a bad plunger. A clogged inline sediment filter right at the inlet or spigot end can choke flow to a trickle without any pressure reaching the pump side at all. A closed low-point drain valve, left shut off from a prior line-blowing session, will do the same thing further downstream. And a bypass valve left in the winterizing position routes incoming water around the water heater and past certain fixtures depending on the plumbing layout, which can look like a dead system when it's really just misrouted; our overview of how the whole fresh water system fits together walks through where each valve sits relative to the inlet. If you've worked through the cause list above and still have nothing, that's the next place to look before assuming the check valve is the culprit.
Frequently asked questions
Can I just remove the check valve instead of replacing it?
No. Pulling the check valve out and running the fitting bare leaves nothing to stop the pump from pushing tank water back out through the city connection, which is why the standard fix is swapping the whole inlet assembly.
Why does water spray back out of the inlet fitting when I disconnect the hose?
That's normal if the plunger is working. Residual line pressure pushes the plunger open for a second as the hose fitting releases, then the spring reseats it. A short spurt is expected; a steady stream after reseating suggests the spring or seat is worn.
Do I need a pressure regulator if my campground water "seems fine"?
Yes. Pressure at a pedestal is unregulated and can spike well above what onboard plumbing tolerates without any warning at the tap, and a burst fitting behind a wall is a far more expensive fix than an inline regulator.
Is a slow trickle at the faucet the same problem as no flow at all?
Usually not. A slow trickle with the plunger moving freely and no closed valves points to a clogged aerator, a partially closed valve somewhere in the run, or a filter due for replacement, rather than the check valve itself.
Can I test the check valve with the hose still connected?
Yes, and it catches a different failure than the plunger-press test. With city water hooked up and the spigot open, shut the spigot off and watch the inlet: a valve holding properly stops the flow at the fitting, while a valve that's seated but leaking will let a slow weep continue past the plunger for several seconds after the spigot closes. A plunger that springs back fine when pressed by hand can still leak under real water pressure if the rubber tip is worn or debris is caught on the seat, which the dry finger test alone won't reveal.
Why does the fresh tank fill up when I'm hooked to city water?
There are two usual causes: a tank-fill (city fill) valve left in the fill position, which sends city water into the tank on purpose, and a worn check valve inside the water pump, which lets city pressure push backward through the pump into the tank. Check the valve first because it costs nothing; if the tank still fills with that valve set to normal, the pump's check valve is next. Walk through pump diagnosis to test that internal valve, or consult the fresh water system guide to see where both valves sit in the plumbing layout.
The city water inlet is one of the smallest, cheapest parts on the whole rig, and it fails often enough that it's worth checking first, before you start pulling access panels or second-guessing the pump. A working plunger, a hose rated for drinking water, and a regulator ahead of the connection cover almost every "no water" call that starts at the campground spigot.
Read next
Keep going on this system
Sources
What this guide is based on
- Camco
- Valterra
- Village Plumbing
- RV Doctor / Good Sam Camping Blog
- Black Series
Built from manufacturer manuals and published specifications. If something here does not match your appliance label or manual, the label and manual win.